Saturday, March 5, 2011

Good things come in small packages!

Lumene Vitamin C+ Radiant Beauty Drops.
  • With age defying arctic cloudberry & brightening lingonberry
    • Arctic cloudberry seed oil protects skin from stress factors
    • Vitamin C together with lingonberry seed oil brightens skin with long-lasting effect
  • For all skin types
  • Optimal care from nature against the first signs of aging
  • An effective beauty treatment to make skin silky soft and radiant
  • Particularly effective for tired and dull skin
Here's what you do: For 28 days, use one capsule and squeeze it's contents onto your fingertip.  Apply to a clean face before day or night cream (totally your preference).  Avoid the sensitive area around your eyes.

These tiny little capsules do contain some pretty awesome stuff!  The tiny little bit of crazily smooth product inside covers every bit of my skin (somehow) and really does make my skin look refreshed and so sooo soft.  Even though it's a 28 day regimen, I've been getting compliments on my skin after only about a week of use!  I wouldn't expect anything else from Lumene.

Love, love, love. =)

Thursday, March 3, 2011

A killer longwear lipcolor? Shut yo' mouth!

L'oreal Infallible Never Fail lipcolour is definitely NOT new, but I never really had the urge to try it until recently.  Let me just say... I was missing out.  Where have you BEEN all my life Never Fail in Apricot?  It's probably going to be my new go to easy lip color.

There are a whopping 25 shades so there's sure to be a color for everyone.  The color is highly pigmented, but it does kind of come out a pinch lighter than advertised, so just keep that in mind during your selection process.  The formula sets quickly, is pretty non-drying.  What I love is that this bad-boy of infallible lipcolor doesn't come with a goopy clear gloss, like some longwear, instead it comes with a lightweight balm.  The balm makes your lips smooth with just a little bit of shine, and you can reapply every time your lips need a little boost.  Even better, it doesn't sit into the creases of your lips like some long wear lipcolors do (no raisin lips, ladies). 

The applicator is a little bit funky... it kind of reminds me of a cigarette lighter.  It's like... the transformer of the lipcolor world.  Each side slides out, but are contained within the crazy little contraption.  The color side twists and you get a little wand applicator, the other "white" side, pops out and you have your balm.  When your done they pop back in.  A little clunky, but... realistically... you can't accidently lose one.  Pretty crafty!

Overall, I'm pretty impressed L'oreal.  After a nine hour work day, involving approximately 3 coffees, bottled water, and a lunch break, I left work with a slightly faded, but still noticeable, apricot colored kisser. 
I'm totally a fan. 

Color me impressed.

I made the trip into the dreaded Walmart in search of Hard Candy's Hide and Glow Cheek Tint.  It would totally figure that Wally World is the only flippin' retailer of Hard Candy that I'm aware of *frown*.  Annnnyyyways....

For only 6 bucks you get two, count 'em: TWO, different, yet corresponding gel based, cheek tints.  I'm madly, madly, madly in love with this product.  Absolutely worth the trip to Walmart.  I picked myself up "In Love" which is probably the warmest of your options.  You get: An awesome peachy, corally color is on one side... and a kind of apricot neutral is on the other.  They have a nice texture (no waxy or greasy at all) and the colors are pretty pigmented;  Very pretty on the skin.  Just a flash of warm color that lasts ALL DAY LONG!

The application is fool proof and takes second... swipe it on your cheeks, blend with fingertips and voilĂ !
Simply swipe on, blend out with finger tips, and you’re golden.  Use one color, or both... I like to use the peachy color on the apples of my cheeks and the apricot just below my cheek bone for just a hint of definition.

I will say that because it is a gel based color, it does kind of chill on your skin rather than sink in.  I definitely wouldn't try to set this with a powder, you'll just have a mess.  Reserve this for natural-beauty kind of days.

The little applicator is pretty damn cute too... kind of like a brightly colored, glue stick for grown ups, except it's for making you look awesome and not a craft project.  The cheek tint twists up in the same manner.  It's a fairly indestructable package too, which means throw that baby in your purse, gym bag, bag pack, or what have you, and don't even worry about a potential makeup mishap.

Officially my favorite find: Hard Candy Hide and Glow duo Cheek tint
For 6 dolla' this is a great deal, especially since you get the 2 shades.  It's definitely a product that will last a long time and there is a killer color selection.

Fit me!

I recently received samples and coupons for Maybelline's FIT ME foundation.  It was super affordable ($5.99 and I had the coupon) so even though I wasn't in the market for a new foundation I decided to give it a try.

Here's the claim
"No oils. No waxes. No nonsense.
Natural coverage that leaves skin the way it was meant to be…fresh, breathing, natural.
Exclusive translucent base and lightweight pigments allow skin's natural highs and lows to show through.
Non-comedogenic, dermatologist tested."

So anyways, I grabbed myself a bottle of Maybelline's FIT ME in shade 235 (18 shades... pretty impressive).  My first impression was pretty positive.  It has a sexy little bottle and the color was a great match.  It had medium coverage, blended very easily and gave me a very natural look.  The liquid formula is super lightweight and blends flawlessly.  There is a slight fragrance to it, but it's kind of a soapy, clean smell so it isn't too obnoxious.

Here's the thing... I was absolutely not impressed by how it held up during the day.  I felt like the formula just evaporated right off my face.  POOF! *gone* I put it on around noon and by 5 or 6 I felt kind of greasy and gross.  It looked alright, just a little shiny.  I tried to touch it up with my pressed powder, but it just felt awful.  I was pretty excited to get the stuff off my face.

Overall... I can see WHY someone would like this... but it wasn't for me.  I'm not really into the whole, oily skin look.  I'm really loving Covergirl's Natureluxe right now.

HOWEVER, I'm pretty stoked about the FIT ME Concealer (there are 6 shades).  It's kind of a thinner consistancy than most concealers, but it's super blendable and gives you great coverage.  When applied to the outter corners of the nose and mouth and inner corners of the eyes it really does a great job of brightening up your face and it does a pretty good job of covering up blemishes.  Totally light on the skin and great for touch ups.

Positively Radiant =)

I wanted to shake things up and try a new moisturizer.  I had read about Aveeno's Positively Radiant Tinted Moisturizer with SPF 30 in a magazine (I think it was Shape) and I had to give it a try.  Honestly, I was thinking about makeup free summer days and hoping that this would be a killer alternative to foundation.

Aveeno Positively Radiant Tinted Moisturizer Medium SPF 30 (It also comes in fair-to-light)
"Natural, light-reflecting minerals and lightweight coverage blend away skin imperfections and immediately bring out skin's natural radiance. Choose from two luminous shades to blend seamlessly with your skin: Fair to Light and Medium. These elegant formulas provide extraordinary natural radiance and coverage at a much smarter price than the leading department store brand. This moisturizer is also oil-free, hypoallergenic, and noncomedogenic."

I'll be honest, when I first tried this moisturizer, I was really put off by the thickness and texture of it.  It seemed so heavy and goopy, I just hated it.  I totally vowed to return it.  At some point I had a weird change of heart and decided to give it a second chance the next day.  Once I got past the texture, I was really surprised by how quickly it absorbed right in and how even my skin tone looked.  Despite the thick formula, I don't feel like it leaves a heavy coat on my skin.

I decided to keep going with it and a week later, I'm pretty sure that my skin had actually IMPROVED... super moisturized and it hasn't broken out or gotten irritated at all.  It's nice that it has a higher SPF too, I bet it's going to be awesome this summer.  The price is a bit steep, I think I paid $15.99, but it's a decent sized bottle and I'm really happy with it.  I'll definitely be buying a 2nd bottle when I run out.

I've been using this under Covergirl Natureluxe Foundation and it makes a great base.  My skin looks flawless and glowing.

Natureluxe... my new love

I was hesitant to try Covergirls NEW Natureluxe foundation because I had been using a foundation for a while that I really liked.  As with most new beauty products, the overwhelming urge to give it a try came over me and I broke down and bought the stuff.  Using the nifty plastic shade matcher that was attached to the shelf I determined (somehow) that I was shade 350 Oak.  (I feel more natural already)

Covergirl Natureluxe Shade 350 Oak $11.99
I *heart* this... move over Simply Ageless, this is my new love.  First off, the texture is awesome - a weird cross between a liquid and a cream.  I was totally stoked about how it made my face feel, the formula is so light and comfortable.  It seemed to absorb right in and felt so natural and nice (Like butta'!).  The color was just perfectly matched, which is just unheard of (they have 14 shades to choose from).  It doesn't look too matte or oily, it just gives you a dewy glow.  It lasts all day without any touch ups... I haven't even been using powder to set after application!  It doesn't oxidize or get dull or ashy over time.  It does have a slight scent, but it's an unobtrusive, light, fresh cucumber smell.  I'm a fan of the package too... super cute, clean and convenient.  It seems a tad small for the price, but let me tell you, you need only the tiniest amount to look amazing.  Totally worth every penny.  =)

I have been wearing this for just about 2 weeks now and I am yet to have a single breakout.  I have terribly sensative skin and a lot of foundations irritate it... so far so good. 

Here's the thing:  If you're looking for a full coverage foundation, this is NOT for you.  Because it is more of a sheer foundation,  it perfects more than it covers up.  Think of it as a pick-me-up for your face... buh-bye dullness and uneven skin tone!
ALSO... if you're prone to oilyness, this is probably not your best bet. 
 Overall... I'm super excited to see a drugstore brand show that it is possible to incorporate more natural-based ingredients while keeping an affordable price.  Right now, the natureluxe line only has the foundation and the balm-gloss (which, by the way, is fantastic).  I'm hoping to see more from Covergirl in the future.

Monday, February 7, 2011

Dreaming of summertime...

So I know that Summer is still a ways away, but I was inspired to play with a light, natural look thanks to good 'ol Punxsutawney Phil
predicting that winter will come to a timely end and a pair of fantastic linen Roxy pants I picked up for half off at a surf shop near my home.
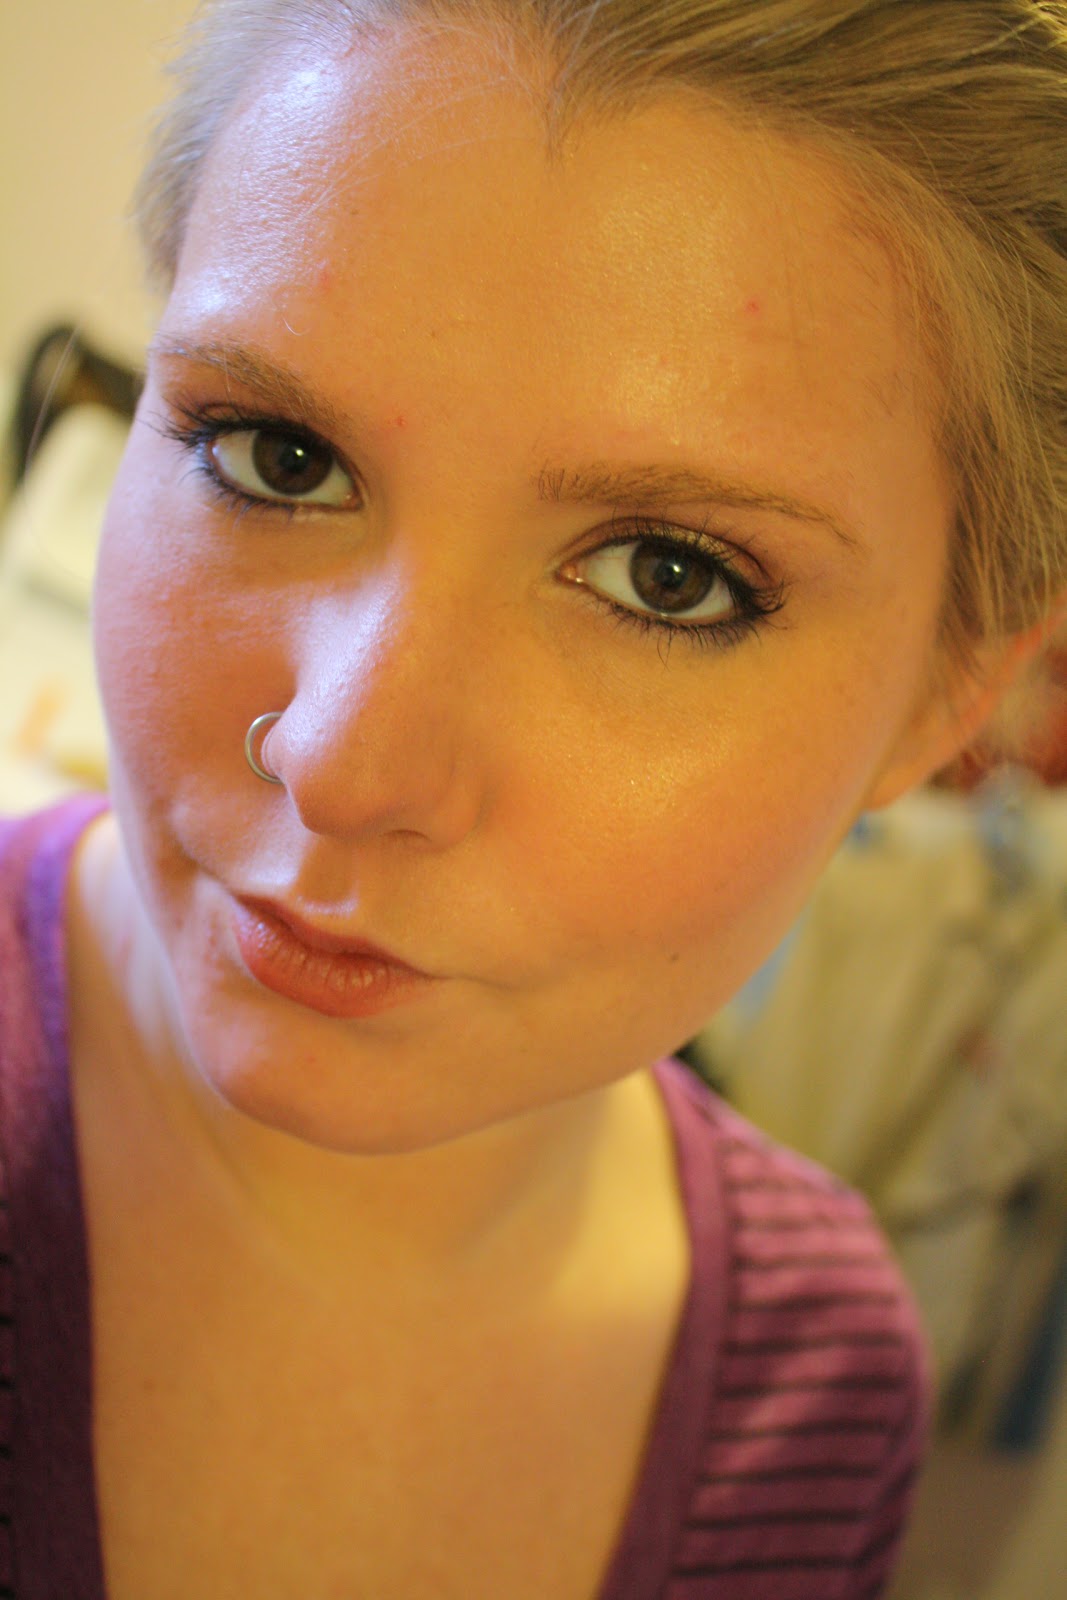
How to get my look:
*The base*
First I applied Jergen's Natural Glow Healthy Complexion Daily Facial Moisturizer Fair to Medium Skin (SPF 20), which gradually builds natural looking color.  Next I used a sponge wedge to apply L'Oreal Paris Studio Secrets Secret No 2 Anti-Dull Skin Primer for deep skin to my cheeks, skin, top of forehead, and chin.  This gives me a slightly peachy tone, evens out my skin tone, and brightens up the complexion.  You don't need a lot, a little bit goes a long way. (L'oreal makes a pink version, for light skin, and a orange one, for deep skin...I used the orange even though my skin isn't exactly deep.  Choose yours accordingly)

*The Foundation*
Before the actual foundation, I applied just a tiny bit of Covergirl Simply Ageless Eye Concealer Shade 210 to my under eyes.  This brightens and covers up any dark-circle issues (like not enough beauty sleep!).  Next, using a makeup round, I applied Covergirl Simply Ageless Shade 240, sparingly concentrating mainly on my cheeks, temples, and forehead, and then smoothed over the rest of my face.  Remember, we are going for a natural look... a lot of ladies apply way more foundation than they really need.  Focus on your problem areas!
To add a flash of sheer color, I blended Covergirl Simply Ageless Sculpting Blush Shade 210 on my cheeks with a makeup round.  When I finished, I added just a touch of Maybelline Dream Mousse Bronzer Shade 10 to the areas where sun would naturally hit (much like how you would apply bronzer): the top of forehead, down nose, and just a tiny bit on the chin.  It gives you just the slightest bit of sun kissed glow.

*The Finish*
I applied Physicians Formula Happy Booster Face Powder in Beige, making sure to tap off the excess before brushing on. Then using a broad sweeping motion and a very light hand, I brushed Physicians Formula Happy Booster Light Bronzer across my cheeks and over my nose.  I then continued the sweep over my forehead and then chin/jawline... WITHOUT applying more of the product to my brush.  Finally, I did a VERY light application with Physicians Formula Multi-Colored Powder Palette Blush Shade Blushing Peach.*
*For these powders, use a Kabuki Style Blush and always be sure to TAP the excess off the brush, all you need is a very light dusting.  A light hand will be sure that you look flawless and glowing without being caked on!

*The Eyes*
For the eyes I kept them as simple as possible and used neutral colors.
On the lids I applied Maybelline New York Eye Studio Color Gleam Cream Eye Shadow Shade Rose Revolution, using a disposable eye makeup applicator (the palette does not come with an applicator, I supposed you could also use your fingertip, if you'd like).  I used the darkest shade on the outer corner and up into the crease, the medium shade on the lid, and the lightest shade was applied to the inner part of my lid.  Using my fingertip, I applied just the tiniest bit of the lightest shade just below my brow and blended.
I lined my top and bottom lash line with Maybelline New York Unstoppable Shade Cinnabar.
I curled my lashes and then applied Maybelline New York Falsies Shade Brownish Black.  Falsies gives you beautiful, bold lashes with just one application.  It's one of my favs... I'm on tube Number 3!
I finished off my eye look by lining the bottom inside corner with just a tiny bit of white liner (it brightens just the tiniest bit).  I used a Revlon liner.

*The Lips*
I finished off my look by applying Revlon Super Lustrous Lip Stick Shade 407 Rosedew over a layer of Berts Bees Chapstick.  It's a really light, non-drying lipstick formula... putting it over a layer of chapstick makes the shade a little sheerer and gives you a nice moisturizing barrier.

Remember!  This is just a guideline and these products are just suggestions... feel free to follow my steps using your favorite products.  Just remember to keep the eyes and lips neutral.  Have fun and play!